Its been a while since I did a ski lesson type post, which was the initial idea of the blog, so here goes with a post on being balanced over the middle of the ski. I have read posts on other sites about finding the sweet spot in the center of the ski. This is a fairly important idea when moving into advanced skiing, so I thought I would put my own spin on the concept.
A common misconception is that it is necessary to lean forwards when skiing. This is probably because many an instructor can be heard telling their clients to get their weight forward, or not to lean back. I have been guilty of this myself on numerous occasions, and as corrective feedback it is perfectly valid to tell somebody who is over the tails of their skis to bring their weight forward. The danger is that they will overcorrect and end up over the fronts of the skis unless it is made clear that they only need to move forward enough to find a balanced position.
In general beginner and intermediate skiers are much more likely to lean backwards than forwards, especially when nervous or tired. It is natural to try and lean uphill, keeping the body as upright as possible, but this translates into leaning back. It is also true that in a snowplough or basic parallel turn leaning back will make it much harder to turn the skis, whereas leaning too far forwards will not cause too many problems. Many skiers will therefore be told to move their weight forwards, while far fewer will be told to move their weight backwards.
The upshot of this is that good intermediate skiers can easliy find themselves leaning too far forward, without ever realising that this is a bad habit that will inhibit their progress towards advanced techniques.
The trouble is that in higher level skiing leaning too far forward is at least as big a problem as leaning too far back. The key is too stay more or less centered over the ski. I say more or less because the point of balance can move forward and back during a turn, but that is a subject for another post.
If the weight is too far back the skis will be sluggish and difficult to turn. When carving the skis will tend to go straight. If the weight is too far forward the skis will tend to pivot around their tips, meaning skidded turns will be less controlled and when trying to carve the tails will break away and skid sideways. In between these two, in the centre of the ski, is the balance point where the ski performs as it was designed to.
Showing posts with label ski lesson. Show all posts
Showing posts with label ski lesson. Show all posts
Sunday, 19 July 2009


Monday, 31 March 2008
Why we don't lean back in powder
There is a common misperception in skiing that in order to ski powder, or other deep snow, it is necessary to lean back. In any type of skiing, it is important to stay centred over the feet, and any fore-aft movement should never take the weight behind the heels. The moment the weight moves aft of the feet, the pressure is on the tails of the skis and you end up trying to turn by levering the whole ski around with the cuff of the boot - not good for your skiing or your legs.
So why do so many people say to lean back in powder? To keep the tips out of the snow is the answer I often hear. Another reason is that good skiers often appear to be leaning back in powder, and their tips often do come out of the snow. Both answers are related, but we need to take a closer look at what is really going on to show that you don't actually have to lean back.
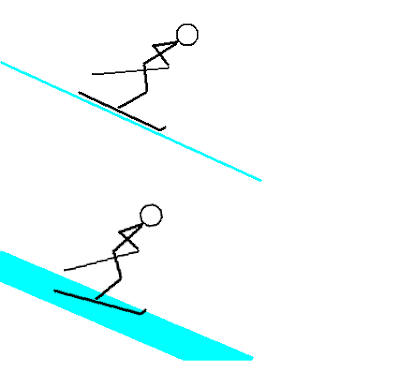
When we say we need to be centred, we are talking relative to the ski - most people know that as the slope gets steeper we have to lean forward more to maintain our position over the ski. On a firm, groomed slope, the ski is flat on the slope, so the position we make over the ski is the same as the position over the slope. However, in deep snow the ski tip needs to come closer to the surface of the snow, and the ski will compress the snow beneath it to form a supporting platform. The result of this is that the ski is no longer parallel to the slope but angled upward, so that the skier who is balanced over the skis appears to be leaning backwards against the slope. The diagram shows two skiers, both in balanced positions on similar pitched slopes, however the bottom skier is in deep snow so the whole picture, including the skis, is tipped backwards.
This may seem a bit pedantic - after all the skier does look like they are leaning back - the important point though is that they will feel centred and in balance. If someone is told to lean back they will inevitably lean onto the backs of their boots and find it hard to stay in control.
So why do so many people say to lean back in powder? To keep the tips out of the snow is the answer I often hear. Another reason is that good skiers often appear to be leaning back in powder, and their tips often do come out of the snow. Both answers are related, but we need to take a closer look at what is really going on to show that you don't actually have to lean back.

When we say we need to be centred, we are talking relative to the ski - most people know that as the slope gets steeper we have to lean forward more to maintain our position over the ski. On a firm, groomed slope, the ski is flat on the slope, so the position we make over the ski is the same as the position over the slope. However, in deep snow the ski tip needs to come closer to the surface of the snow, and the ski will compress the snow beneath it to form a supporting platform. The result of this is that the ski is no longer parallel to the slope but angled upward, so that the skier who is balanced over the skis appears to be leaning backwards against the slope. The diagram shows two skiers, both in balanced positions on similar pitched slopes, however the bottom skier is in deep snow so the whole picture, including the skis, is tipped backwards.
This may seem a bit pedantic - after all the skier does look like they are leaning back - the important point though is that they will feel centred and in balance. If someone is told to lean back they will inevitably lean onto the backs of their boots and find it hard to stay in control.
Saturday, 22 March 2008
Dealing with Ice

We have reached that part of the season where the slopes are usually very firm in the mornings due to the melt-freeze cycle. Some days the snow can be firm and grippy, other days it can be like a sheet of ice. Ice is one of the most intimidating snow types for many skiers, so it seems like a good idea to address the techniques to manage it. Technically there is a difference between hard slippy snow (stuff that fell out of the sky and has transformed due to weather, passage of skiers, groomers etc.) and ice (water which was liquid and then froze), but to most skiers the difference is academic.
On firm, slippy, icy terrain there is a perception that the skis need to be edged more to increase grip. In order for this to work the pressure against the skis needs to be increased to maintain balance, and the picture looks like the skier on the left in the diagram. The force against the skis has to be balanced by the centrifugal effect of the skier going around the turn, and by the weight of the skier. With high performance skis, perfectly tuned, a very good skier can do this. However, maintaining this position is dependant upon the skis continuously gripping a very firm surface. The moment the grip fails the skis skid out sideways and the skier's mass will fall downwards, probably hitting the ground.
If you are racing, or race training, the technique described above works well. For most people the skier on the right in the diagram illustrates a more realistic approach. Accept that you are going to skid sideways, and try to make it a controled skid. Keep the skis fairly flat and the bodyweight above them - this way when the skis skid sideways the body is not left hanging in the air but stays above the feet. Making skiddy turns keeps the speed under control and minimising the pressure under the feet reduces the likelihood of the skis skiiding out sideways. The idea, unless you really want to go fast over the ice, is to ski delicately and gently. Even if you want to start carving turns on ice, try to stay more over your feet and use less pressure. It is possible to increase the edge angle whilst keeping the center of mass closer to the feet, but that is another lesson I'm afraid.
Ice is just one more type of snow (notwithstanding the comment above) with its own set of demands on the skier. If you don't let it intimidate you it can be just as rewarding as any other condition.
Sunday, 9 March 2008
Drag lift tips

Following my tribute to the Poma drag lift in the last post, I am going to give some hints on using these and other drag lifts for the newer skier who may not have come across them yet. I teach many second or third week skiers who can happily get around the mountain and use the chairlifts, but look at me blankly when I suggest taking a Poma up the hill.
These lifts work by having a large button on the end of a pole which is attached to a moving cable overhead. The button is placed between the skier's legs and tows them up the mountain. Other drag lifts exist including the T-bar (where two skiers can ride together, one each side of the T) and the simple rope tow (hold the rope and let it drag you).
The big difference with any type of drag lift is that your skis (or snowboard) stay on the ground. It may seem obvious, but the lift does not support you, it tows you. Therefore you need to stand up - if you try to sit down on it you WILL fall.
Since you are skiing on these lifts, you need to point your skis straight ahead, parallel. If you point your skis to the side you will get dragged sideways, and again, you will fall. The lift won't steer your skis for you, you have to do it yourself.
To mount a Poma lift, check which side of you the button lift will be on, and put your poles in the opposite hand. Slide forward to the gate, or wand. Wait for the gate to open, or the light to go green. Slide forward through the wand and in one motion pull the button down towards you and place it between your legs. Be ready for the acceleration as the lift will move quickly once it starts.
To dismount, pull the button towards you and out from between you legs, then let it go and slide forwards. DO NOT dismount too early.
If you fall over on a drag lift, let it go and move off the track quickly. Don't try to hang on.
Moving on to the rules. There are two common rules on drag lifts, which good skiers tend to ignore as they think they know better. I have been guilty of this in the past, but in fact the rules are there for good reasons. If you understand why the rules are there, at least you can break them properly.
Rule 1 - No slalom
I.e. ski in a straight line under the cable and don't weave from side to side. The reason for this is that skiing out to the side pulls the cable out sideways, and in an extreme case it could cause the cable to derail from the pulleys. Fixing this takes a good bit of effort and the lift will be shut for an hour at least.
Rule 2 - Don't get off half way
The reason for this rule is that a button released early can wrap itself around a pylon and cause at best a lost button, at worst a derail. If you are going to hop off early, always do it after a pylon and not before. This is more of a problem with T-Bars and non-detachable button lifts which are attached to the cable with a reel of rope. As the rope reels back in, the button or T-bar can swing around a pylon quite easily.
Sunday, 24 February 2008
Ski School Race - Tactics
As promised previously I am going to take a look at tactics for the ski school race. This is the race which many ski schools (including ours) hold at the end of a week's lessons. The course (here at least) consists of around ten gates (poles) set at around 12 metre intervals as a slalom course. The poles are spring loaded so they will bounce back when you hit them.
The advice here is aimed at beginner and intermediate skiers based on the commonest mistakes I have observed. Seasoned ski racers will have a much more technical approach than this.
The key to getting a good time is starting well to gain speed, then maintaining that speed until the bottom of the course.
 To get a good start, be ready for the signal. In a World Cup ski race, the racer has a ten second window during which they can leave the start gate at any time. In a typical ski school race the timing is not that sophisticated, and relies on stopwatches. When you get the signal to start, push once with you poles, then skate (push off one ski and glide on the other) to get up to speed.
To maintain your speed, the most important factor is the line you take. Make smooth curves as a sudden change of direction will cost you speed. Beginning with the first gate, take a high line so you are above the gate and can turn down towards it. Your aim is to be half-way through the turn when you reach the gate. The pink line in the diagram shows a skier heading straight for the first gate and beginning their turn when they reach it. They then have to fight to get to the next gate and are late for each turn all the way down. The green line shows a good line where the skier turns early and carries their speed down the course.
The final point where people often lose time is the finish. As you approach the finish line you can stop turning and go straight for the line. Often, as you approach the last gate before the finish it will be possible to see a straight line for the finish. If this is the case, point your skis that way and go.
Obviously there can be only one winner, but if you follow the advice here you have that much more chance of going home with the coveted medal.
Good luck
The advice here is aimed at beginner and intermediate skiers based on the commonest mistakes I have observed. Seasoned ski racers will have a much more technical approach than this.
The key to getting a good time is starting well to gain speed, then maintaining that speed until the bottom of the course.
 To get a good start, be ready for the signal. In a World Cup ski race, the racer has a ten second window during which they can leave the start gate at any time. In a typical ski school race the timing is not that sophisticated, and relies on stopwatches. When you get the signal to start, push once with you poles, then skate (push off one ski and glide on the other) to get up to speed.
To maintain your speed, the most important factor is the line you take. Make smooth curves as a sudden change of direction will cost you speed. Beginning with the first gate, take a high line so you are above the gate and can turn down towards it. Your aim is to be half-way through the turn when you reach the gate. The pink line in the diagram shows a skier heading straight for the first gate and beginning their turn when they reach it. They then have to fight to get to the next gate and are late for each turn all the way down. The green line shows a good line where the skier turns early and carries their speed down the course.
The final point where people often lose time is the finish. As you approach the finish line you can stop turning and go straight for the line. Often, as you approach the last gate before the finish it will be possible to see a straight line for the finish. If this is the case, point your skis that way and go.
Obviously there can be only one winner, but if you follow the advice here you have that much more chance of going home with the coveted medal.
Good luck
Thursday, 31 January 2008
How to ski powder

Skiing powder is one of the most rewarding, exhilarating and at the same time potentially frustrating experiences you can find on a pair of skis. The technique is not necessarily difficult, if the snow is friendly, but it is one that many skiers struggle to get to grips with. This is particularly true in the many ski areas worldwide where powder snow is a cherished rarity rather than a daily occurence, meaning this is a technique that skiers do not get to practice that often.
Since I wrote this post around three years ago it has consistently been one of the most visited pages on the whole blog. With this in mind an update with new photos and a few extra tips seems a good idea.
It is true that very deep powder, or deep snow that is heavy or crusty, can be difficult to ski and require very precise balance. On the other hand a manageable depth of light fluffy powder is not that difficult to ski but it can be quite counter intuitive as you have to forget a portion of what you have learnt for skiing on the pistes.
The biggest difference in powder is that the ski is floating within the snow, rather than riding on top of a hard surface. What is actually happening is that the ski compresses the soft snow beneath it until it can support the ski. This means that the ski tends to bend under the skier's weight with the tip and tail being pushed upwards by the snow. The diagram below shows a weighted and unweighted ski in powder. The difference on the shapes means that the weighted ski will tend to float upwards and the unweighted one to dive downwards.
The upshot of this (apologies for getting a bit technical there) is that weighting the outside ski, as you might on piste, will result in the inside ski nosediving and the skier making a spectacular cartwheel. To avoid this you need to apply the weight to both skis equally. Try to develop a rhythm - push down on the skis so that they bounce up closer to the surface, then turn and sink down ready for the next bounce.

As noted in the comments below, there is a common myth that it is important to lean back in powder. This is definitely not the case - if you lean back your legs get tired and it is much harder to turn. I explain this in more detail in the post Why We Dont Lean Back In Powder.
It is also quite important to ski quite delicately in powder, and even more so in more difficult soft snow conditions. If you over-pressure or over-edge a ski it tends to cut into the snow, sink and stop. I like to think of a bounce and float turn - bounce to initiate the turn as described above, then gently float both skis through the turn as they unweight.

It is important to note that powder is normally found off piste, and skiing off piste carries a whole new set of inherent risks. Avalanches, route finding, unmarked hazards like cliffs and ravines, crevasses on glaciated terraine, tree wells in the trees are just a few. I don't want to put you off, but you do need to be prepared. Learn about the hazards and how to deal with them. Seek local advice, check the avalanche and weather forecasts, take safety equipment (transceiver, shovel, probe) and know how to use it. The safest option is to hire a qualified guide. That said, it is often possible to find powder snow on the edge of the pistes, or in patrolled areas of resorts that are deliberately left unpisted, and these areas are relatively safe to go and play in.
Updated 9th April 2011
Saturday, 12 January 2008
Don't Panic!
Being a ski instructor, writing a ski instructing blog, it seems about time I wrote a ski instructional post. I have been planning to write an occasional series of instructional posts for different levels of skier for some time. This post is mainly aimed at intermediate skiers - from those trying to make their turns parallel up to parallel skiers trying to break into carving.
I have taught several people recently with the same issue holding back their skiing - namely a rush to get the skis around the turn too quickly, so that their tracks look like the diagram below on the left. Zig zags. The problem with this is that there is only control of speed at the apex of the turn. It is a bit like driving by alternately flooring the accelerator and brake pedals. The reason I think a lot of people do this is that they do not like the idea of their skis pointing straight down the slope.
The diagram on the right shows a curved path where speed is controlled all the way through the turn apart from the short transition which is circled. Although the curve is 'officially' called the control phase, we often call it the 'Oh ****' phase as this is what the skier is thinking as they begin to point down the hill and gain speed. The key is not to panic at this point; let the skis point down the hill for a split second and then finish the turn smoothly. I am not going to go into how to finish the turn - that is another lesson altogether, and at this level you should already have a pretty good idea.
So, just to recap - zig-zags are bad, curves are good, take your time with the turn, let the skis point downhill and don't panic.

I have taught several people recently with the same issue holding back their skiing - namely a rush to get the skis around the turn too quickly, so that their tracks look like the diagram below on the left. Zig zags. The problem with this is that there is only control of speed at the apex of the turn. It is a bit like driving by alternately flooring the accelerator and brake pedals. The reason I think a lot of people do this is that they do not like the idea of their skis pointing straight down the slope.
The diagram on the right shows a curved path where speed is controlled all the way through the turn apart from the short transition which is circled. Although the curve is 'officially' called the control phase, we often call it the 'Oh ****' phase as this is what the skier is thinking as they begin to point down the hill and gain speed. The key is not to panic at this point; let the skis point down the hill for a split second and then finish the turn smoothly. I am not going to go into how to finish the turn - that is another lesson altogether, and at this level you should already have a pretty good idea.
So, just to recap - zig-zags are bad, curves are good, take your time with the turn, let the skis point downhill and don't panic.

Subscribe to:
Posts (Atom)
